
Download Zoom desktop client (Windows or Mac)
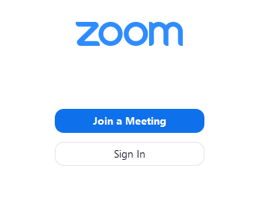
After launching Zoom, click Join a Meeting to join a meeting without signing in. If you want to log in and start or schedule your own meeting, click Sign In.
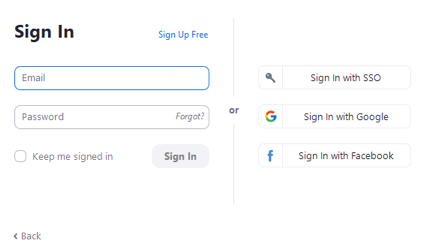
To sign in, use your Zoom, Google, or Facebook account. You can also log in using SSO. If you don't have an account, click Sign Up Free.
NOTE: Employers hosting virtual booths will want to consider purchasing a Pro license in order to host group meetings longer than the 40-minute maximum allowed with the free account. To purchase, click Choose a Plan.
If you have a Zoom account but cannot remember your password, click Forgot.
After signing in, you will see the Home tab, where you can click these options:
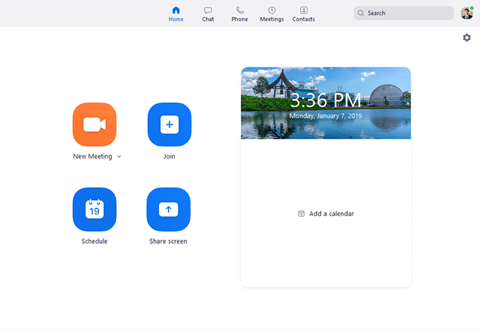
- New Meeting: Start an instant meeting. Click the downwards arrow to enable video or use your personal meeting ID (PMI)for instant meetings.
- Join: Join a meeting that is in progress.
- Schedule: Set up a future meeting.
- Share Screen: Share your screen in a Zoom Room by entering in the sharing key or meeting ID.
- Date and time with background image: To change the background image, hover over the picture and click the camera icon.

- Upcoming meeting: Displays the next meeting for the current day. Add a third-party calendar service if you want to sync upcoming meetings.
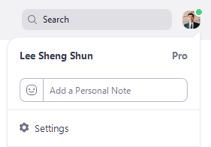
- Click your profile picture for these options:
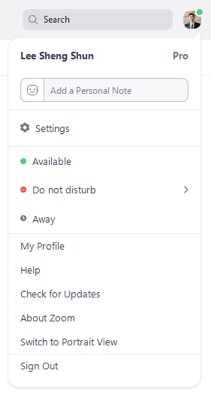
- Add a personal note.
- Settings: Access settings you can change in the client.
- Change your status to Available, Away, or Do Not Disturb.
- My Profile: Open the Zoom web portal to edit your profile.
- Help: Open the Zoom Help Center.
- Check for Updates: Check if Zoom is up to date.
- About Zoom: View the current version.
- Switch to Portrait View: Switch the Zoom window to portrait view if you prefer a narrower window.
- Sign out
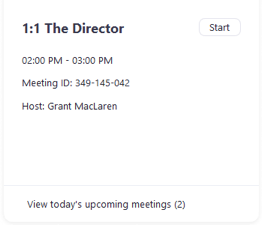
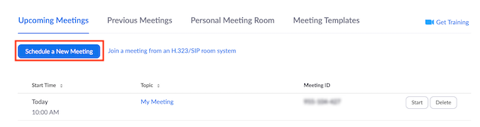
Select the Meetings tab and click Upcoming to view, start, edit, and delete scheduled meetings.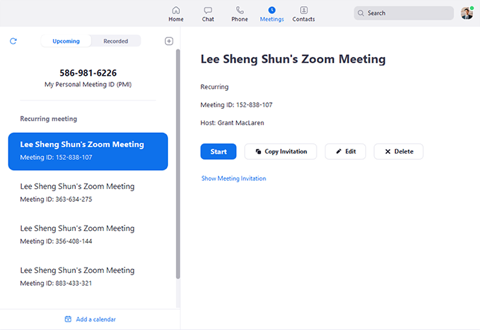
You can click the following options after selecting a scheduled meeting in the left-side panel:
- Add icon (+): Schedule a new meeting.
- Refresh icon: Refresh the meeting list if you don't see your scheduled meeting.
- Start: Start the scheduled meeting that you have selected in your upcoming meetings.
- Copy Invitation: Copy the scheduled meeting's invitation text, allowing you to manually paste into an email, instant messenger, etc. Click Show Meeting Invitation if you want to view the invitation you're copying.
- Edit: Edit the meeting options for your scheduled meeting.
- Delete: Permanently delete your scheduled meeting.
Select the Contacts tab to view and manage your contacts.
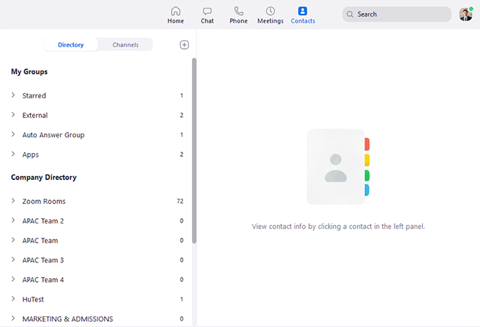
- Directory tab: View a directory of all your contacts, including starred, external, and auto answer If your organization has Zoom Rooms, you will also see a list of Zoom Rooms.
- Channels tab: View a directory of your channels (used for group messaging). Starred channels appear at the top of the list.
- Add icon: Show options for contacts and channels. You can add a contact, create a contact group, create a channel, or join a channel.
Once you have started or joined a meeting, you can access the meeting controls located at the bottom of the meeting window (move your mouse in the Zoom window to display meeting controls).
Learn more about meeting controls for hosts, co-hosts, and attendees. You can also join a test meeting to familiarize yourself with meeting controls before joining a scheduled meeting.
Overview
- Schedule from the Zoom desktop client or mobile app
- Schedule from the Zoom web portal
 Open your Zoom client and sign in to Zoom.
- Click on the Schedule icon.
This will open the scheduler window. - Select your meeting settings. Note that some of these options might not be available if they were disabled and locked to the off position at the account or group level.
- Topic: Enter a topic or name for your meeting.
- Start: Select a date and time for your meeting. You can start your meeting at any time before the scheduled time. You can also manually enter any time. For example, you can enter 15 in the minutes field to schedule a time in a 15-minute increment.
- Duration: Choose the approximate duration of the meeting. This is only for scheduling purposes. The meeting will not end after this length of time.
- Time Zone: By default, Zoom will use your computer's time zone. Click the drop-down menu to select a different time zone.
- Meeting ID
- Generate Automatically: Generate a random unique meeting ID.
- Personal Meeting ID: Use your Personal Meeting ID.
- Security
- Passcode: Enter a meeting passcode. Joining participants will be required to input this before joining your scheduled meeting.
Note: The meeting passcode must meet the complexity requirements set by your admin. - Waiting Room: Enable Waiting Room for the meeting.
- Passcode: Enter a meeting passcode. Joining participants will be required to input this before joining your scheduled meeting.
- Video
- Host: Choose if you would like the host video on or off when joining the meeting. Even if you choose off, the host will have the option to start their video.
- Participants: Choose if you would like the participants' videos on or off when joining the meeting. Even if you turn off, the participants will have the option to start their video.
- Audio: Allow users to call in using Telephone only, Computer Audio only, Both, or 3rd Party Audio (if enabled for your account).
- Calendar: Select a calendar service to add the meeting to and send out invites to participants.
- Outlook: Generate an .ics file that will open in Outlook, Windows Mail, or iCal.
- Google Calendar: Launch your default browser and open the invite in Google Calendar.
- Other Calendars: Open a new window, where the meeting text can be copied pasted into the user's preferred communication method.
- Advanced Options: Click on the arrow to view additional meeting options.
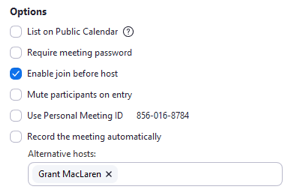
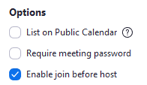
- Enable join before host: Allow participants to join the meeting without you or before you join. The meeting will end after 40-minutes for Basic (free) users if 3 or more people join the meeting.
- Mute participants on entry: If join before host is not enabled, this will mute participants as they join the meeting. Participants can unmute themselves after joining the meeting.
Note: To mute all participants currently in a meeting, see the options to manage participants. - Only authenticated users can join: Restrict access to the meeting so that only signed-in using can join.
- Alternative hosts: Enter the email address of another Zoom user who is Licensed, on your account to allow them to start the meeting in your absence.
- Language Interpretation (only supported in Windows and macOS clients): Enable language interpretation for the meeting.
- Topic: Enter a topic or name for your meeting.
- Click Schedule to finish, and open the selected calendar service to add the meeting.
Note:- Choosing Other Calendars will allow you to copy and paste the scheduled meeting information such as date, time, and meeting URL.
If you are the meeting host and need to start or join a scheduled meeting, there are several ways that you can join the meeting. As the host, you can start the meeting from the Zoom desktop client for Mac, PC, or Linux, the Zoom app for Android or iOS, your web browser, or an H.323 or SIP device.
 In the Zoom client, click Meetings.
- Under the Upcoming tab, select the meeting you want to start. Additional options will appear.
- Click Start.
Overview
When scheduling a meeting, the host can designate another Licensed user on the same account to be the alternate host. The alternative host can start the meeting on the host's behalf. This user will receive an email notifying them that they've been added as an alternative host, with a link to start the meeting.
Note: If you're not sure that alternate host is the right role for you, learn about roles in a meeting.
- Both users need licenses on the same account
- Alternative hosts must be logged in to Zoom with the correct account in order to be granted the host or co-host permissions
Limitations
- The alternative host can start the meeting using the join link in the email or calendar invite sent to them by the host. The meeting will not display in the list of the upcoming meetings in the desktop client or mobile app for alternative hosts.
- Alternative hosts can't schedule on behalf of the host. If you need to schedule a meeting on behalf of another user, use scheduling privilege. You can also give another Licensed user scheduling privilege, which allows them to schedule meetings for you and makes them an alternative host for those meetings.
- If a host is attending a meeting but needs assistance with managing the meeting, they can assign a co-host during the meeting. Learn more about roles in a meeting.
Designating an alternative host
-
- Sign in to the Zoom desktop client.
- Click on the Schedule.
This will open the scheduler window. - Click Advanced Options.
- In the Alternative Host field, enter the alternative name to search through users. You can also enter the alternative host's email address if their name doesn't come up.
- Click Schedule to finish, and open up the calendar you have selected.
- The alternative host will now receive an email letting them know that they have been added as an alternative host.
Frequently Asked Questions (FAQs)
Overview
When you schedule a meeting, you can save the settings for that meeting as a template for scheduling future meetings. The template includes settings like enabling join before host, automatic recording, and alternative hosts. For recurring meetings, you also have the option to save the recurrence schedule as part of the template.
After you save a meeting as a template, you can select that template when you want to create a meeting with similar settings. You can select from up to 40 saved meeting templates.
Creating a meeting template
To create a meeting template, you configure and save a meeting with the settings you need, then save that meeting as a template. To create a meeting template:
- Sign in to Zoom web portal.
- In the navigation menu, click Meetings.
- Click Schedule a New Meeting.

- Change the settings that you would like to apply to the template.
Note: All settings made while scheduling the meeting will be applied to the meeting template. This includes polling.
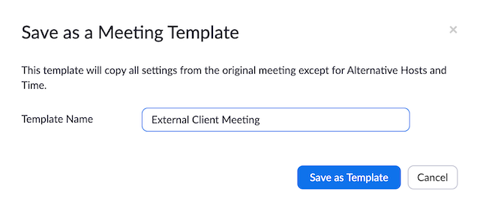
- Click Save.
- Click Save as a Meeting Template.

- Specify the Template Name, then click Save as Template.
Scheduling a meeting from a template
After you have created one or more meeting templates, you can schedule a new meeting that includes all of the settings from that template. Note that the new meeting does not include the dates. To schedule a meeting from an existing template:
- Sign in to Zoom web portal.
- Click Meetings.
- Click Schedule a New Meeting.
- Choose a previously saved template from Use a template menu.
 Basic and advanced settings from the template are copied into the newly created meeting.
 - Update the meeting name and description (if needed), and update the date/time information or recurrence information if you saved this in the template.
- Change any other settings, then click Save.
Note: If you have saved one or more meeting templates, you can view or delete them from the Meeting Templates tab. You can save up to 40 meeting templates.
Overview
Join before host allows attendees to join the meeting before the host joins or when the host cannot attend the meeting.
If you select join before host, then the participants can join the meeting before the host joins or without the host.
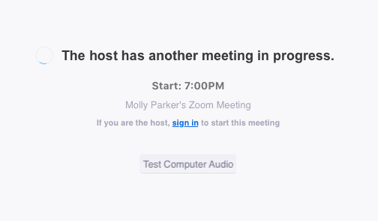
If you do not select join before host, the participants will see a pop up dialog that says "The meeting is waiting for the host to join." If you are the host, there is a login button to login and start the meeting as the host.

Enabling Join Before Host
For all members of your organization
If you turn on Join Before Host for all members on your organization, it will be on by default for any newly scheduled meetings, but members will be able to uncheck it when scheduling a meeting. To force this setting on for all meetings, you will need to lock the setting.
- Sign in to the Zoom web portal as an administrator with the privilege to edit account settings.
- Click Account Management> Account Settings.
- Navigate to the Meeting tab and verify that the Join Before Host setting is enabled.
If the setting is disabled, click the Status toggle to enable it. If a verification dialog displays, choose Turn On to verify the change.

- (Optional) If you want to make this setting mandatory for all users in your account, click the lock icon, and then click Lock to confirm the setting.

For your own use
If you turn on Join Before Host in your meeting settings, it will be on by default for any newly scheduled meetings, but you will be able to uncheck it when scheduling a meeting.
- Sign in to the Zoom web portal.
- Click Account Management> Account Settings (if you are an account administrator) or Settings (if you are an account member).
- Navigate to the Join Before Host option on the Meeting tab and verify that the setting is enabled.
If the setting is disabled, click the Status toggle to enable it. If a verification dialog displays, choose Turn On to verify the change.
Note: If the option is grayed out, it has been locked at either the Group or Account level, and you will need to contact your Zoom administrator.
Enabling Join Before Host for an Individual Meeting
- Open your Zoom application and log in to Zoom.
- Click Schedule. This will open the scheduler window where you can select your meeting settings.
- Click Advanced Options.
- Check Enable join before host.
- Click Schedule.
Note: You can also turn on Join Before Host for any scheduled meeting. Click Meetings at the bottom of the Zoom application. Hover over the meeting you want to turn it on for and click on Edit. Click Advanced Options, check Enable Join Before Host, and click Save.
Overview
Zoom does not allow a user to host multiple meetings at the same time. If the host attempts to have concurrent meetings by scheduling two different meetings at the same time and enables join before host for both meetings (or has an alternative host start one of the meetings), the following issues can occur:
Common Issues
- If participants attempt to join a meeting that the host hasn't started yet, they will receive the message:
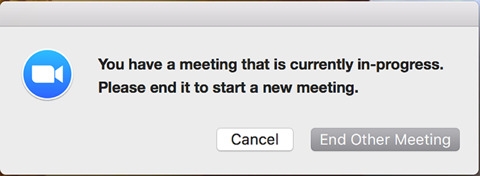
- If the host (or alternative host) tries to start a different meeting at the same time, they will be prompted to end the first meeting:
- If the host chooses to end the meeting, the participants will receive the following message:

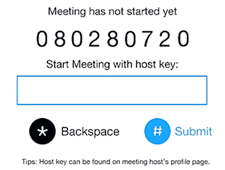
- 323/SIP Devices that join a meeting with join before host enabled, and the host is already hosting another meeting. When the device joins, it will be prompted for a host key for the meeting:
- If a Zoom Room attempts to start a second meeting with join before host enabled, it will end the first meeting without warning.
Overview
The Virtual Background feature allows you to display an image or video as your background during a Zoom Meeting. This feature works best with a green screen and uniform lighting to allow Zoom to detect the difference between you and your background. You can upload your own images as a virtual background. You can also use Virtual Background in a Zoom Room.
Recommended setup
- To achieve the best virtual background effect, Zoom recommends using a solid color background, preferably green. Recommended green screens from Webaround or Amazon.
- Higher quality cameras result in a better virtual background. See camera recommendations for details.
- Use uniform lighting and color.
- Do not wear clothing that is the same color as the virtual background.
Background image
- There are no size restrictions when adding your own virtual backgrounds, but we recommend cropping the image to match the aspect ratio of your camera before uploading it.
Example: If your camera is set to 16:9, an image of 1280 by 720 pixels or 1920 by 1080 pixels would work well. - If you're not sure about your camera aspect ratio, use a background image with a minimum resolution of 1280 by 720 pixels.
- Use these sources for royalty-free images: Pexels, Unsplash, Pixabay.
Enabling Virtual Background
Note: Users must sign out of the Zoom Desktop Client and sign back in for Virtual Backgrounds to take effect.
Account
To enable the Virtual Background feature for all users in the account:
- Sign in to the Zoom web portal as an administrator with permission to edit account settings.
- In the navigation menu, click Account Management then Account Settings.
- In the Meeting tab, navigate to the Virtual Background option (under the In Meeting (Advanced) section) and verify that the setting is enabled.
Note: If the setting is disabled, click the toggle to enable it. If a verification dialog displays, choose Turn On to verify the change.

- (Optional) If you want to make this setting mandatory for all users in your account, click the lock icon, and then click Lock to confirm the setting.
- (Optional) Click Manage virtual background to upload default background images available for users.
Group
To enable the Virtual Background feature for all members of a specific group:
- Sign in to the Zoom web portal as an administrator with permission to edit user groups.
- In the navigation menu, click User Management then Group Management.
- Click the name of the group, then click the Meeting tab to access Settings.
- In the Meeting tab, navigate to the Virtual Background option and verify that the setting is enabled.
Notes:- If the setting is disabled, click the Status toggle to enable it. If a verification dialog displays, choose Turn On to verify the change.
- If the setting is grayed out, it has been locked at the Account level and needs to be changed at that level.

- (Optional) If you want to make this setting mandatory for all users in this group, click the lock icon, and then click Lock to confirm the setting.
- (Optional) Click Manage virtual background to upload default background images available for users.
User
To enable the Virtual Background feature for your own use:
- Sign in to the Zoom web portal.
- In the navigation menu, click Settings.
- In the Meeting tab, navigate to the Virtual Background option (under the In Meeting (Advanced) section) and verify that the setting is enabled.
 Notes:
- If the setting is disabled, click the status toggle to enable it. If a verification dialog displays, choose Turn On to verify the change.
- If the option is grayed out, it has been locked at either the group or account level, and you will need to contact your Zoom administrator.
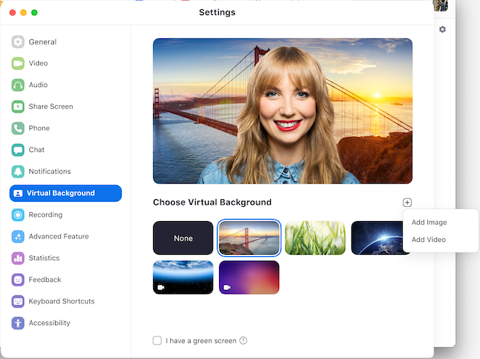
Using Virtual Background
- Sign in to the Zoom desktop client.
- Click your profile picture, then click Settings.

- Select Virtual Background.
Note: If you do not have the Virtual Background tab and you have enabled it on the web portal, sign out of the Zoom Desktop Client and sign in again.

- Check I have a green screen if you have a physical green screen set up. You can then click on your video to select the correct color for the green screen.
- Click on an image to select the desired virtual background or add your own image by clicking + and choosing if you want to upload an image or a video.
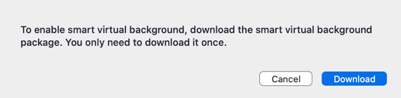
 If prompted, click Download to download the package for virtual background without a green screen.
 Notes:
- Ensure that you are using a solid background color.
- After you select an option, that virtual background will display during your meetings.
- To disable Virtual Background, choose the option None.
Enabling Virtual Background during a meeting
If you have already have Virtual Background enabled in the web portal, you can turn it on during a meeting.
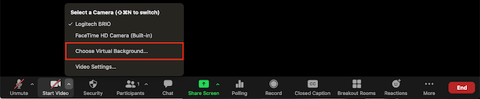
Zoom Desktop Client
- In a Zoom meeting, click the upward arrow (^) next to Start/Stop Video.
- Click Choose Virtual Background...
- If prompted, click Download to download the package for virtual background without a green screen.
Troubleshooting
If you are experiencing issues with Virtual Background, try the following troubleshooting tips:
- If you do not have the Virtual Background tab in your desktop client settings after enabling it, sign out of the client and sign in again.
- Manually pick the background color to ensure the correct color is selected. This option is only available after you click an image.
- Ensure that the background is a solid color with minimal shadows. Also, ensure the background is uniform in lighting. A 3-point lighting setup is ideal.
- Ensure that your green screen color does not match your shirt or eye color.
Overview
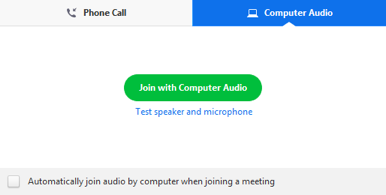
There are two ways to join meeting audio, joining via computer or joining via telephone. Follow these sections to test your audio before or after joining a meeting.
You can also join a test meeting if you want to test your audio and familiarize yourself with meeting controls.
Prerequisites
- Microphones, such as the built-in microphone, a USB microphone or an inline microphone on headphones
- Speaker or headphones
Testing Audio Before Joining a Meeting
If you haven't enabled the setting to automatically join by computer audio, you can test your speaker and microphone before joining a meeting:
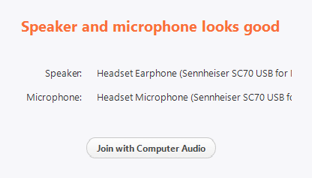
- After joining a meeting, click Test speaker and microphone.

- The meeting will display a pop-up window to test your speakers. If you don't hear the ringtone, use the drop-down menu or click No to switch speakers until you hear the ringtone. Click Yes to continue to the microphone test.

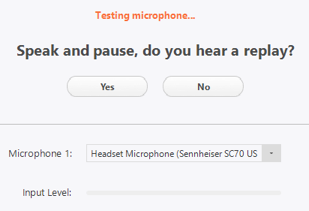
- If you don't hear an audio replay, use the drop-down menu or click No to switch microphones until you hear the replay. Click Yes when you hear the replay.
- Click Join with Computer Audio.
- Click Join with Computer Audio to join the test meeting with the selected microphone and speakers.
Testing Audio Using Audio Settings
To test your audio, navigate to your audio settings before or during a meeting:
Before a meeting
- Log in to the Zoom client.
- Click your profile picture then click Settings.
- Click the Audio.

- Follow the sections below to test your speaker or microphone.
During a Meeting
You can access your audio settings and test your audio when you are already in a meeting.
- In the meeting controls, click the arrow next to Mute/Unmute.

- Click Audio Options. This will open your audio settings.
Testing your Speaker
- Click Test Speaker to play a test tone.
- If you cannot hear it, select a different speaker from the menu, or adjust the Volume.
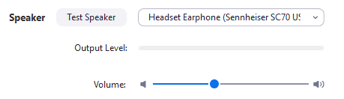
Learn more about audio settings.
Testing your Microphone
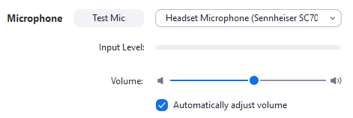
- In the Microphone section, you will see the green Input Level bar move when Zoom is picking up audio.
- Click Test Mic to test your microphone.
- Your audio will start recording. Click Recording when you are done and it will playback. You can select another microphone from the menu or adjust the input level.
- Check Automatically adjust microphone settings if you want Zoom to adjust the input volume automatically.
Learn more about audio settings.
Microphone Troubleshooting
- If you are on Mac OS 10.14 Mojave or earlier and can't access the microphone, check your operating system permissions to confirm that Zoom has access to the microphone. See Using the Zoom Client and Zoom Rooms with Mac OS 10.14 Mojave for more information.
- If you are on Windows 10 and can't access the microphone, use the Windows search box to navigate to Microphone privacy settings. Switch on the Allow apps to access your microphone toggle, and enable access for Zoom.
Overview
Your meeting will automatically end based on the idle time, type of account, number of participants. These time limits apply to meetings and webinars regardless of the device used to start the meeting (client, app, or phone).
If your meeting is timing out when it should not be, see Why is my meeting timing out?
Free licenses (Basic)
Meeting timeout at 30 hours
- 1 host, no participant
- 1 host, 1 participant
- No host, 2 participants (join before host)
Meeting timeout at 40 minutes
- 1 host, 2 participants or more at the same time
- 0 host, 3 participants or more at the same time(join before host)
Note: If participants leave the meeting and join again before their first connection is fully terminated, it may count them as two different participants and trigger the 40-minute time limit.
Paid licenses (Licensed and On-Prem)
Meeting timeout at 30 hours
- 1 host, no participant
- 1 host, any number of participants
- 0 host, any number of participants (join before host)
Meeting timeout at 40 minutes
- 1 host and 1 or more participants joined. Only one person remains in the meeting. The meeting will end 40 minutes later if no one else joins.
Note: The meeting durations for paid users only apply to users assigned a paid license or using Webinar licenses (for webinars, panelists are treated the same as participants, however, attendees do not affect time duration). Users with basic (free) licenses on Pro, Business, or Education accounts are limited to the free license meeting durations. However, if a Basic user schedules a meeting and starts that meeting from a paid Zoom Room on the same account, the meeting will not time out after 40 minutes, despite the number of participants. If the Zoom Room is a free trial, the meeting will still time out.
Why is my meeting timing out?
If you are using a Pro account type and you are receiving a notification that your meeting will end in x amount of minutes (timing out) you may not be logged in with the email that is associated with your Pro account.
Please open up your zoom client and log out and then log in with your email that is associated with your Pro account.
If you are logging in with the correct address, you will need to contact your administrator to be assigned a paid license.
For more help, please visit the Zoom Help Center for assistance.
Questions? Contact Dr. Laura Hammons
at lhammons@cvm.tamu.edu or 979.458.1089.