
General Principles
- Keep the tissue moist using physiologic (normal, 0.9%) saline
- Minimize handling; don’t use forceps (produces crush artifacts)
- Don’t risk cross-contaminating formalin tissue samples with the Michel’s samples
- Keep the Michel’s Medium chilled
PLEASE FILL THE EMPTY FORMALIN JAR 2/3 OF THE WAY WITH FORMALIN.
1. Remove the biopsy core from the needle:
- Use physiologic saline (in a 12 ml syringe fitted with a 25 ga needle)
- GENTLY wash the tissue out of the needle onto a glass slide (ie, held just under the needle)
- End up with the biopsy core in a small puddle of saline on the slide
- Use the saline syringe/needle to wash the needle (with vigor, if needed) before the next pass
Tip: To manipulate the tissue core on the slide, use the point of a 25 ga needle and/or the corner of a single-edge razor blade to nudge it around in the saline puddle on the surface of the slide (like tugboats moving a bigger ship around in a harbor).
2. Promptly assess tissue adequacy (that the cores are of cortex and contain glomeruli) and:
A. Obtain at least:
- 2 good cores that are ≥ 10 mm long
- 3 good cores if they are < 10 mm long
B. Divide the total available material for EM, LM, and IF (see other side of this page)
- Use fresh, clean single-edge razor blade(s) to cut the core(s) transversely
- Separate the pieces for EM, LM, and IF
Tip: Presuming that each portion contains glomeruli, the ‘amount of specimen’ requirements are smallest for EM, medium for IF, and largest for LM; so, divide the total amount of cortical tissue that is available accordingly.
3. Transfer the pieces into their respective fixative/preservative solutions
A. Do the EM piece(s) first (should go into formalin within 5 minutes)
- put it(them) in the 10% formalin solution (we will transfer these pieces to 3% Glutaraldehyde solution upon receipt in our laboratory)
B. Do the LM piece(s) next
- put it (them) in the 10% formalin solution
C. Do the IF piece(s) last
- put it(them) in the Michel’s Transport Medium (and put the bottle back in the refrigerator)
- these samples should not touch formalin because that can result in artifactual autofluorescence
Tip: To transfer the pieces, we usually use a single-edge blade to ‘scoop’ up the piece, which typically clings (due to surface tension) to the ‘wet-with-saline’ edge of the blade, and then we use a pipette containing some fluid from the destination bottle to wash the sample off the blade and into the bottle using a new blade and pipette for each tissue transfer task. The last piece(s) on each slide can be washed directly into the destination bottle off a corner of the slide.

Suggested ways to divide renal biopsy cores for light microscopic (LM), transmission electron microscopic (TEM), and immunofluorescence (IF) evaluations when: (A) cores are not examined with sufficient magnification to directly assess their composition (and thus, which end is cortical and which end is medulla is uncertain); (B) cores are verified to be composed of cortex and 2 long (> 10 mm) cores are available; and (C) cores are verified to be composed of cortex and 3 short (< 10 mm) or fragmented cores are available.
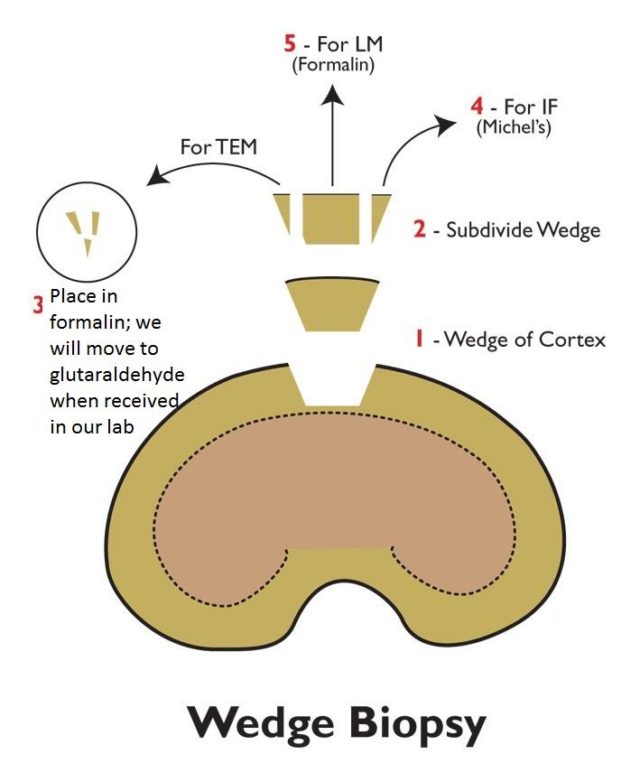
Suggested steps to subdivide and process a wedge biopsy of kidney for light microscopic (LM), transmission electron microscopic (TEM), and immunofluorescence (IF) evaluations, including: (1) retrieve a wedge of renal cortex kidney; (2) subdivide the wedge by trimming small portions from each side for the TEM and IF evaluations; (3) transfer the portion for TEM evaluation into formalin; (4) put the portion for LM evaluation into formalin; and (5) put the portion for IF evaluation in an appropriate preservative (Michel’s transport media).